Showing posts with label Sorbetto. Show all posts

Saturday, May 05, 2012

Dart Difficulty


So, you're probably wonder how that Sorbetto top is coming.  Well, currently, it's not.  I was hoping to have it done by the time we left for Iowa for Cate's baptism, but we have gone and come back and still no Sorbetto.

When last we spoke re: Sorbetto I had made a boat-load of adjustments and adjusted the dart height on my muslin.  After that, I took it totally apart and transferred the new dart position and the sloped shoulders adjustment to my paper pattern which is now made out of Swedish Tracing Paper (love that stuff!).  Then, I made a new muslin in quilting cotton with the thought that if it came out okay, I would bind the neck and armholes and add it to my wardrobe.

Fig. 1.  A boat-load of
adjustments
Well, it didn't get added to my wardrobe and the problem was the bust darts.  See, I put it on and there were these funky bubbles of fabric at the ends of the darts.  So, I googled "bubble at end of bust dart" (God bless the internet; 10 years ago I would have seen the bubbles and given up) and found that these bubbles are not an uncommon problem.  I tried the easy fixes of resewing the darts several different ways (shortening them, curving them slightly, stitching a few straight stitches at the end of the darts) but nothing seemed to work.  So, I had to resign myself to the idea that, sadly, it was going to take something a little more complicated to fix this issue.  A number of full-busted gals mentioned having this problem and it turns out it can be due to short darts that have to take up a lot of fabric (I actually talked about this with my mom and she agrees that's probably the issue, although she's never experienced it since, if anything, she'd be modifying a shirt with a Small Bust Adjustment; genetics are weird sometimes).  The solution seems to be to divide the one dart into two.

Unfortunately, there doesn't seem to be a lot of information out there about how to change 1 large dart into two smaller darts that are close together and in the same region.  There's information about moving darts around but this was a little bit different.  I eventually decided to measure the distance between the two legs,  divide that number by 2, and draw two new darts that were more diagonal than horizontal to the side seam.  Then, I transferred the markings to the muslin and sewed it all up again and...

...there were still little bubbles at the ends of the darts.

At this point, I put the project in time out.  I only had a day or two until I was leaving for Iowa for Cate's baptism and didn't have time to mess with a misbehaving shirt.  Since then, I've thought about it some more and I think part of the issue may be the fabric as well.  I didn't notice the bubbles on my first muslin which was made from cheap broadcloth.  That fabric had a lot of drape compared to the quilting cotton of the second muslin.  I do still think that taking up so much fabric in such a short dart is going to give me problems, but they'd be less noticeable in a fabric with more drape.
Fig. 2.  A diagonal dart near the hem
will be longer than a horizontal dart
and might be better suited to such
a large dart.

So, I'm still going to have to fix the dart problem.  I've been thinking about how I should do it.  One way is to keep working on making the 2 parallel bust darts.  I was also thinking that if I did a long diagonal dart from closer to the hemline, then I might be able to get away with one dart.  I'm not going to let my difficulties with this project get the better of me, though.  I'm going to have a perfect-fitting top if it kills me!

And then I'm going to make about ten different versions of this shirt because I'm not going through all of this for one measly shirt!

Thursday, September 01, 2011

Maternity Sorbetto FBA: Take #2


So, in my first post on modifying the Sorbetto pattern, I mentioned that I was using the book Pattern Fitting With Confidence as a reference.

Fig. 1.  She doesn't look very confident, does she?
 In order to add room for an ample bust, the book suggests increasing the size of the bust dart and adjusting the length of the front in order to compensate for the increase in the size of the dart. Well, I tried that method and it did not give me enough room. In fact, after that modification, I still needed to add at least 2.5 inches overall to the bust area just to get a fitted bust and another 1.5 inches for ease. I'm tempted to say that the Pattern Fitting with Confidence bust adjustment was a complete....bust (ha.ha). Perhaps it works for small increases or maybe I did something wrong? I dunno. Additionally, the book does not give you instructions on how to add more room if you find that your first adjustment is not sufficient. Presumably, you make an even larger dart (because that worked so well the first time), but by how much?

So, I decided to try the "slash and spread" method of increasing the bust size which pretty much seems to be the method of choice on every sewing blog I've ever read. What this method has going for it is that I can make the adjustment based on the size of the gap that resulted from slashing my muslin in the bust area.

However, I think that, rather than attempt to incorporate the changes from the muslin into the front pattern piece, I'm going to just start over. There are a couple of reasons I think this is the way to go. First, because I need to add ease overall in that area (front and back). I think the best way to do this is extend the side seams at the bustline on both the front and back pattern pieces. The second reason is I want to determine if the slash and spread method FBA will give me the right fit in the bust from the very beginning. I think this will be useful since it seems that the slash and spread FBA will be my method of choice in the future and it would be good to know how well it works.

So, following the instructions from here, I spent about 3 hours making pattern alterations Wed. night. For real. I can only hope that things will go faster the second time I try to do an FBA!

Fig. 2.  My pattern adjustment tools.  Not shown:  tape.  Lots and lots of tape.
 At any rate, the first thing the instructions tell you to do is a tissue fitting. I have never tried doing a tissue fitting before, but there's a first time for everything.

To do the fitting, I traced the original pattern onto tissue paper. I traced out a size 10 in the shoulders and armholes, a size 14 in the side seams until the waist, and blended to a size 18 at the hem. I pinned the dart closed as if I had sewn it and pressed it down, pinned the pleat out of the way so I could see where the center of the front was, and pinned the front and back together at the side seams and shoulders, then tried it on in front of a mirror. I didn't take pictures of the tissue fitting because of that whole not wanting half-naked pictures of myself on the internet thing. The result was that the center of the pattern was offset from the center of my torso by 2 inches.
Fig. 3.  An artist's rendering of my tissue fitting.

So, changes made to the pattern:
  • Full Bust Adjustment. Using the slash and spread method, I increased the bust by 2 inches. This increased the dart, lengthened the pattern, and increased the waist by 2 inches.
  • Changed the dart position. After the FBA, the dart was no longer pointing to the apex. The dart was also no longer horizontal but sort of pointing downward. I tried to follow the instructions for changing the dart, but I needed to rotate it to make it horizontal again. The result is that I'm not quite sure I have the dart right and I think I may have lost a little room in the side seam? I dunno. I figured I'd go to the muslin stage and see how it turned out.
  • I also added six inches length to the center front to make sure my belly was covered. I curved the hem to the original size 18 hemline at the side seam.
  • I had to add 7/8 in. in length to the back side seam to get it to match up with the front side seam after the FBA. Then, I added 1 in. in length to the center back and curved the hem to the newly drawn hemline at the side seam.
Now, because I blended to a size 18 from the waistline to the hemline and I added 2 inches to the width of the waist while doing the FBA (more on that in a second) and I'm only sewing the pleat down to just past my bust, I believe I will have ample room for my big belly with a little room to grow, even. So, I didn't need to do a special adjustment to make this a maternity top.

Fig. 4.  You too can wear a tent!
Which brings me to my next point, what would I have done if I wasn't pregnant? The waist would have had 4 total inches added to it (since the pattern piece is half of the front, the total added is 2 in. x 2)!!!

 That's really not going to work post-pregnancy. So, how does one fix that? Do you put in a second dart at the waist?  I don't think that would look right on this particular pattern since it is meant to be only slightly fitted.  Do you somehow close that area up?  Take the extra out of the side seams?  Part of the point of doing an FBA (I thought?) was to add room to the bust and nowhere else to avoid making something that fit like a muumuu.

At any rate, after making all of the changes listed above, I pinned the tissue pieces back together and tried it on again.  It seemed to fit, so I'm going forward with the muslin.  We'll see what happens when I try this in fabric!
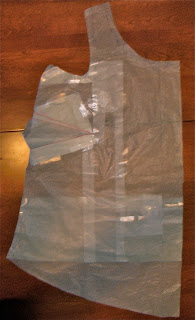
Fig. 5.  Behold!  The Frankenpattern!

Friday, August 26, 2011

Maternity Sorbetto Muslin Fitting


So, aided by my trusty helper (I can trust that he will always stop whatever he is doing and come lay on my sewing) I cut the modified Sorbetto pattern pieces out of muslin and machine basted them together. I didn't bother putting the binding on the armholes or neckline because they're not necessary for fit and that's all I'm looking at right now. I didn't hem it either, just sewed a basting stitch where the hem would fall after being sewn so I would have some idea where that would be. I did sew the pleat down to just past the bust, pressed it, and basted it at the top to sort of anchor it down.

So, the first issue materialized as I was sewing the side seams.


Evidently, despite my efforts to curve the hemline back to the tip of the original side seamline, the back is still shorter than the front. So, I'll adding length to the back for sure.

Then, I tried the muslin on.


It looks surprisingly good, given all of my adjustments and the fact that I'm a novice at pattern adjusting!

The good stuff:
  • The belly area doesn't look as tentish as I feared after cutting out the modified pattern (which just means that my belly really is that big now *sigh*) although there's definitely room for my belly to grow so I will be able to wear this top for awhile (I live in the SF Bay Area, so we will be having sleeveless top weather for awhile yet).
  • I like where I ended the pleat. It gives definition to the top of the...uh...top and offers something to draw the eye away from the big honkin' belly below. For the real deal, I may embellish the pleat more, maybe with buttons or a little bit of lace or ribbon down the sides of the pleat? I don't know, we'll see what inspiration grabs me.
  • By not sewing the pleat all the way down the front, I did get extra room for my belly, so that little bet paid off.
  • The bust darts are at the right level, pointing straight at the "apex" of my bust (I guess it's not common in sewing to just say "nipple").
  • For the most part, I like how the shoulders, neckline and underarm fit which tells me that starting with a size 10 in that area was a good idea.
The not-as-good stuff:
  • Well, obviously, I need to add some length to the back so it will match the front
  • I'm going to add length to the front, too. I like the length exactly how it is without the hem. So, I need to add the amount of the hem (5/8 inch) to the front before adding length to the back.
  • There was a tiny amount of gaping under the arm that I pinched out.
  • The upper back feels a bit tight just above the waist. Now, this could be due to problems in the bust, but I don't think so for reasons I'll get into later.
  • The bust darts seem a little long, ending almost at the apex. I might make them about half and inch shorter.
The major issue:

  • It is way too tight in the bust.
So, the biggest modification I need to make is to add room in the bust. I first tried removing some of the stitching in the pleat so that it was shorter and left more room for my bust. But, I didn't like how that looked (there was a distinct increase in tentness) so I resewed it. So, in order to figure out just how much to add to the bust area, I needed to slash the middle of the top, to see how much it spread apart at the bust. But, of course, I had this pleat there and as soon as I started slashing, the pleat was going to have all of this extra fabric flapping around. So, I sewed down the sides and middle of the pleat in order keep it tacked down during the slashing.

I didn't take a photo of this part because I'm not keen on putting pictures of me in my bra on the internet. So, trust me when I say that I there was a gap of about 2.5 inches in the bust area after slashing. Now, I assume that if I do an FBA to add 1.25 inches (since the pattern piece is half of the front, I need to use half of the total gap distance), I will end up with a fitted bust. However, the pattern is supposed to have about 3 inches of ease (I figured this out by looking at the pattern size chart and comparing the finished measurements of the bust to the sewist's bust measurement). That's 1.5 inches of ease for the front. So, I'm trying to decide if that means I should add 0.75 inches to the side seam at the bust and do an FBA for 1.25 inches or should I do an FBA that adds 2 inches to the bust (1.25 + 0.75) in order to get the proper fit?

The upper back was still a bit tight after slashing the front so I think that I need to add some width there. Again, there should be 1.5 inches of ease across the back and at the moment, it's skin tight. So, I need to add 0.75 inches to the pattern piece (which is 1/2 of the width of the total back). I'm guessing that means that I simply need to go up a size or two in that area to get the back right.

So, more pattern modifications and a new muslin are in the works (also a trip to the fabric store because I am fresh out of muslin). Hopefully this new round of modifications will fix the current problems without creating new ones!

Monday, August 22, 2011

Sorbetto modifications

It's starting to be all baby all the time here at e-beth knits, so I thought I'd throw in something that is only a little bit baby.

Ever since the Sorbetto pattern was released, I've been wanting to make one. It's a pretty simple, slightly fitted slip-on top (no closures) with a box pleat detail in the front and the armholes and neck are finished with bias tape. I've resisted making the top until now because, of course, I am currently not at my regular body size/shape. For instance, my stomach now sticks out further than my boobs. This is a little weird considering it's been about 25 years since anything on my body has stuck out further than my boobs.

But, I have an overwhelming urge to make myself a top, so, I decided to try and modify the Sorbetto to make it a maternity top. Considering that: 1) I've yet to make a top that fits me and 2) I'm completely new to pattern modification, I may well have bitten off more than I can chew. Nevertheless, I sat down at the table with my Sorbetto pattern, and my various pattern-adjusting accoutrement. These included: freezer paper for tracing, a tracing wheel, pens and pencils, a curved ruler, a calculator, a notebook, tape, push pins, and a cardboard cutting mat.

So, first up, I had to decide what pattern size to use. I decided to tackle the back first since I didn't need to adjust for boobs or belly. According to my upper bust measurement, I should use a 10. So, I started with that. I want to keep the back fitted and not baggy (to minimize the "tent effect" so prevalent in maternity tops), so I decided I would try cutting the back piece as though I wasn't pregnant and adding all of the extra inches to manage my belly to the front piece. Therefore, I measured my back across my natural waist approximately from side seam to side seam and decided I need a 14 there, so I basically drew a line that went from the size 10 line at the armhole to the size 14 line at the narrowest part of the pattern. Then, I drew a line from there to the size 18 line at the hem to account for my hip measurement. Then, I traced the pattern onto the freezer paper. Finally, I wanted to make the hemline curve (because I am making the front hemline curved so that I can add extra inches in the middle to cover the belly), so I extended the line for the center back (to be placed on the fold) 1 inch and used my curved ruler to draw a curve to the original hemline at the side seam. That was all pretty straightforward.

Next, I tackled the front which was not at all straightforward. I started with a 10 on top (shoulders and armholes) and then I did a Full Bust Adjustment. I used the technique in Pattern Fitting With Confidence by Nancy Zeiman which is unlike anything I've seen on the web, but I figured I'd give it a try. Essentially, she has you increase the bust dart according to cup size and increase the length of the front to account for the change in dart size. So, I traced a size 10 and cut it out, then followed the FBA instructions from the book, and cut that pattern piece out. That was all relatively easy. Then, I ran into something of a wall. Briefly, moving the side seam out by three inches at the waist gave me something that looked like the bust and the waist couldn't connect without creating some funky shape. I decreased the amount I added to the waist by half because I thought that if I didn't sew down the center box pleat past the bust, I would end up having extra room from that. Eventually, I was able to draw a line I thought might work for the side seam. Then, I wanted to add length to make sure it covered my belly. I added 3 inches to the center front and curved the hem to the original hemline at the side seam. Hopefully, this means that the front and back pieces will line up. Having made all of those adjustments, I cut this final pattern piece out (I numbered all of my drafts of the pattern, btw, and wrote on them what adjustments they incorporated so I could keep them straight)

Bottom line: the front pattern piece doesn't much resemble the original Sorbetto front pattern piece any longer. Actually, it looks amazingly tentish (is so a word!) which is something I've been trying to avoid with maternity wear (I feel like a blimp already, I don't need an immense, baggy shirt to emphasize that fact). So, I'm not at all convinced this modification will work at this point, and even if it does work and everything fits, I'm not sure I'm going to like how it looks on me. But that's why you make a muslin, right?